Woodturners have many options when it comes to taking a piece of rough-cut wood and creating a finished piece of art. One unique option is to use the bark as an integral element of the bowl – creating what is called a natural edge that contrasts with the smooth-finished wood. Natural edge bowls also have a unique edge profile that follows the curvature of the log, adding a dynamic element to the piece.
A number of challenges are presented while creating this type of bowl, foremost is the delicate cuts required while cutting around the edge of the bowl where the tool is unsupported for a significant percentage of the rotation.
A suitable blank is selected for the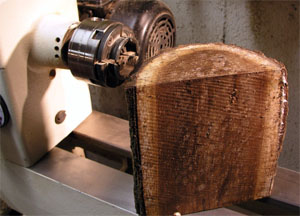 turning. When considering the candidate, it is important for the blank to have solid bark, with no voids in the target edge area. This particular blank is green-wood black walnut, with the very center of the log (the pith) removed.
The blank will be mounted with a normal faceplate. Alternatively, it could be mounted using a screw chuck (my preferred method). It is extremely important to mount the faceplate on the bark side of the blank. A 3-inch forstner bit is used to cut a faceplate-sized relief in the blank. This gives the faceplate or chuck a flat, firm surface to mount against. The only drawback to using the forstner bit is you are unable to make any adjustments to center and align the blank (Another tutorial will discuss this in detail).
If using a faceplate, center it on the blank with one set of screws lined up with the centerline of the log – these will carry the bulk of the holding load. Longer screws will be used on the perpendicular holes (the holes that span the width of the log) and steady the blank. Make sure the screws are long enough to penetrate through the bark and into solid wood, but not so long that they intrude into the finished profile of the bowl.
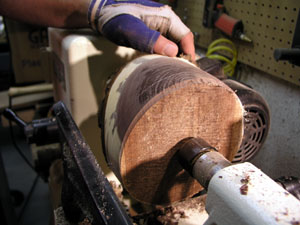
In case you’re concerned about the holding power of the faceplate, it’s going to to be complemented with the tailstock for the rough turning. In this manner, the faceplate is relegated to acting like one large spur drive center. This image shows the blank adequately mounted to the faceplate with the tailstock lightly supporting the blank. 
Note that the corners of the blank have been knocked off on the bandsaw – there’s no reason to cut a round profile on the saw, as it’s quicker to simply rough turn the blank to shape. Make sure there is adequate clearance from the motor, bed, and tool rest by manually turning the blank.
Now’s the time to grab your faceshield and make sure your tools are extremely sharp. Don’t ever attempt to turn natural edge pieces without a faceshield.
Starting with the lathe on the slowest speed, use a roughing gouge (don’t forget the face shield), bring the log to a cylinder, speeding up the lathe as the blank begins to balance out. This is a quick process, however, be careful as this is the time that loose bark will fly off the blank. It may also be prudent to protect the lathe bed prior to turning green wood, as it may cause rapid rusting if precautions aren’t taken.
Note that I use gloves to protect my hands – this keeps any splintered pieces and hot shavings from the skin.
 After rough-turning the blank to cylinder, check the blank carefully for any cracks or voids that will impact the final piece. This blank yielded a nice surprise of heavy spalting in the sapwood. Note the remaining sap in the heartwood – this is an indicator of how wet the hollowing process will be. If the blank looks stable and free of checking, proceed with a deep-flute bowl gouge to flatten the face supported by the tailstock, stopping short of intruding into the
  tailstock.
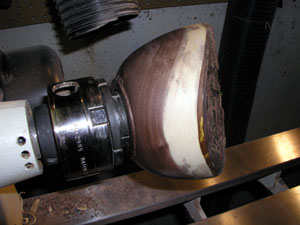
Here, we see the progress of rough-turning the profile the bowl. The goal is to roughly define the desired outside shape. Don’t be too concerned about the surface quality – the goal is to let the wood guide you to a pleasing shape that helps display the features of the grain or features.

As turning progresses, the lathe is sped up, and the cuts are lighter and lighter. The spalting in the sapwood is even more prevalent now. The surface quality at this stage is the result of the lighter cuts, which to be gentler on end grain resulting in less tear out.
Continue to refine the shape as desired. Be sure that the profile extends seamlessly into the the bark portion of the blank. Once the shape as is completed, remove the tailstock and craft the foot to accept the scroll chuck. I prefer a to provide a nice profile inside the foot socket as a surprise when people pick up the piece and turn it over.
A series  of light finishing cuts will yield the results shown in this image. Careful, light finishing cuts with very sharp tools minimize tear-out and loss of bark at the rim. Stop frequently to check for tear out.
Inspect the bark, treating any loose bark with a light application of CA glue. Using glue is an absolute last resort, as it adds an unnatural finish to the bark, and may impact finishing the sapwood (due to absorption into the wood.
At this point, the outside profile is sanded and polished, ready for a protective finish such as oil. It’s important to complete it now ready for finish, as we won’t have the opportunity to return to the outside profile unless you want to complete it by hand.
In preparation for hollowing, remove the blank from the lathe, remove the faceplate, and remount the blank on the scroll chuck slightly loose. Turn the lathe by hand and check for misalignment. Correct any run-ou t by slightly loosening the chuck and reseating the blank. Take time to do this right as it has a direct impact to achieving an even wall thickness as we hollow the blank. Remember, any misalignment will reveal itself as double the wall thickness error on each side of the finished bowl.
Time for some fun – grab a deep-flute bowl gouge and make a plunging drilling cut into the center o f the bowl to the desired depth. This will establish the rough-cut depth for hollowing. Alternatively, I’ll use a forstner bit to do the dirty work for me. Do NOT use a spade bit – doing so will most certainly damage or destroy something.
Conti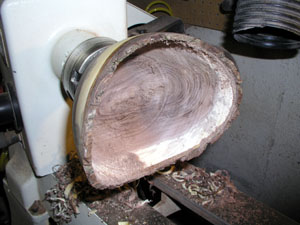 nue to expand the hole into the hollowed interior of the bowl. Work rather rapidly if this is green wood to minimize warpage. As the wall thickness is reduced, it won’t take long for the wood to loose moisture content and being to move on you.
As the wall thickness is reduced, it is important to always cut from the edge and move towards the bottom of the bowl. This reduces lifting stress on the bark, helping to maintain edge integrity.
Use every cut as a practice cut. Don’t wait until the wall (and natural edge) is too narrow to figure out how to make the desired cut. Practice now so you’ll know what the approach you want to make. Hollow the interior to an oversized wall thickness as shown above. As the wall is reduced further, take lighter, careful cuts when moving into the wood.
Carefully approach the wood with the tool at a negative angle, so the cutting edge cannot catch. Always cut into the bark, into the wood. As mentioned earlier, reversing the direction will tend to lift the bark from the piece. One miscue at this time will blow the bark off the piece, totally ruining the effect of the natural edge.
As the finished thickness approaches, you will note that the tool is unsupported for a considerable percentage of the blank rotation. A ve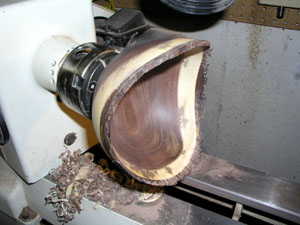 ry light cut is called for until wood supports the gouge adequately – support the tool laterally with your thumb at the tool rest. It may help to speed up the lathe, but be sure to let the tool work lightly and carefully.
If all went well, the final finishing cuts will yield good results. A consistent wall thickness from top to bottom will yield an even natural edge thickness. As this blank was green, a con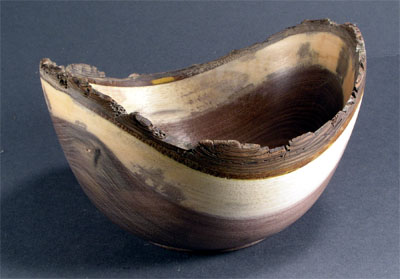 sistent thickness will minimize any checking as the wood seasons.
Complete any sanding and polishing desired before finish is applied. My preference is to sand with 220 through 1000 grit, followed by a series of 00 and 0000 non-steel abrasive pads. Finish with buffing wheels for a final polish.
Here’s the finished bowl, ready for a protective coat. It shows off a beautiful natural bark rim, interesting spalting, and a unique shape. It measures approximately 8″ in diameter, standing about 4″ tall. As the wood seasons, the piece will shrink across the log (the shorter sides), further accentuating the elliptical shape to the finished piece. A light application of tung oil cut with mineral spirits will be wet-polished into the wood, taking care to fill the bark. Finally, I sign and date the bottom of the bowl.

I am getting ready to attempt a blank that you gave me @ the demo on Sat. I will keep you informed. Jim
I blew my first attempt will try again. I lost the bark first thing and the bark on my next one is loose. I will give it another try.
Don’t be discouraged. Remember to use an edge-in cut to minimize lifting the bark. Think of it as pushing the bark into the log with your cut. But, as you saw in the demo, there’s often nothing you can do to save the bark once it decides to “part ways”, in spite of our best care. See, I planned it that way so you could see what could go wrong 🙂